Showing posts with label preserving. Show all posts
Wednesday, April 2, 2014
Monday, March 24, 2014
Chef Jeff's Online Reading List
In talking with friends over the last few weeks I thought it'd be great to put together a list of some of the resources I've found on the web for recipes, ideas and general food porn. Enjoy!
GENERAL SITES:
The amateur and professional links below provide a great deal of inspiration and information... There are some folks out there who put me to shame as far as creativity and guts in the kitchen... Homemade fish sauce??
blog.ideasinfood.com/
Saveur.com
Chefsteps.com
nordicfoodlab.org
www.punkdomestics.com
ruhlman.com
www.starchefs.com
www.americanfoodroots.com
www.thekitchn.com
www.southernfoodways.org
frombellytobacon.com
food52.com
FERMENTED/CULTURED FOODS:
With the rise in popularity of fermented foods, i.e., kim chee, sauerkraut, kombucha, yoghurt, etc. sites like these are proliferating rapidly as cooks and chefs try to regain traditions before they are lost forever. (see my Fermentation class April 17th...)
blog.culturesforhealth.com
www.fermentersclub.com/
PRESERVES:
foodinjars.com/
frombellytobacon.com
www.onetomato-twotomato.com
CURED MEATS:
A subject near and dear to my heart and belly- (see my Sausage class May 29th...)
curedmeats.blogspot.com
honest-food.net/
sausagedebauchery.blogspot.com/
frombellytobacon.com
www.onetomato-twotomato.com
BREAD & BAKING:
www.thefreshloaf.com/
COCKTAIL INGREDIENTS:
Some very in-depth and somewhat esoteric information on the ever growing world of cocktails. Plus for cooks like me, who love to "make it myself" the sites below provide very interesting "projects." Why not learn to make your own bitters, vermouth and nespolino liquer?
modernistcuisine.com/recipes/instant-infusions/
www.porkcracklins.net/2013/06/strawberry-balsamic-shrub/
boozedandinfused.com/
www.clubborgodivagli.com/content/nespolino-liquor
www.saveur.com/article/Recipes/Sotto-Chinotto
vermouth101.com/
GENERAL SITES:
The amateur and professional links below provide a great deal of inspiration and information... There are some folks out there who put me to shame as far as creativity and guts in the kitchen... Homemade fish sauce??
blog.ideasinfood.com/
Saveur.com
Chefsteps.com
nordicfoodlab.org
www.punkdomestics.com
ruhlman.com
www.starchefs.com
www.americanfoodroots.com
www.thekitchn.com
www.southernfoodways.org
frombellytobacon.com
food52.com
FERMENTED/CULTURED FOODS:
With the rise in popularity of fermented foods, i.e., kim chee, sauerkraut, kombucha, yoghurt, etc. sites like these are proliferating rapidly as cooks and chefs try to regain traditions before they are lost forever. (see my Fermentation class April 17th...)
blog.culturesforhealth.com
www.fermentersclub.com/
PRESERVES:
foodinjars.com/
frombellytobacon.com
www.onetomato-twotomato.com
CURED MEATS:
A subject near and dear to my heart and belly- (see my Sausage class May 29th...)
curedmeats.blogspot.com
honest-food.net/
sausagedebauchery.blogspot.com/
frombellytobacon.com
www.onetomato-twotomato.com
BREAD & BAKING:
www.thefreshloaf.com/
COCKTAIL INGREDIENTS:
Some very in-depth and somewhat esoteric information on the ever growing world of cocktails. Plus for cooks like me, who love to "make it myself" the sites below provide very interesting "projects." Why not learn to make your own bitters, vermouth and nespolino liquer?
modernistcuisine.com/recipes/instant-infusions/
www.porkcracklins.net/2013/06/strawberry-balsamic-shrub/
boozedandinfused.com/
www.clubborgodivagli.com/content/nespolino-liquor
www.saveur.com/article/Recipes/Sotto-Chinotto
vermouth101.com/
Monday, March 10, 2014
The Preserves follow-up Part 2
Here are the jars of Kim Chee ready to ferment in the cool cupboard.
And the tart I made with the Rhubarb preserves and stretched with Blueberry preserves... Still Delicious!!
And last but not least, Kim Chi marinated pork chops... Kim chi juice, soy sauce, ginger and scallions. They'll marinate today and go on the grill tonight.
Next Class: Chef Jeff's Supper Club: Cuban! Thursday, March 20th at the Center for Living Peace (goodhappens.org )
Saturday, March 8, 2014
Preserves Class Follow-up: Sauerkraut & Kim Chee
Sauerkraut or Kim Chee
1 (2-pound) head napa cabbage, white or red cabbage or a mix
Small head of cauliflower
1/4 cup sea salt or kosher salt
Water
1 tablespoon grated garlic (about 5-6 cloves)
or two green garlic stalks
For Kim Chee:
1 teaspoon grated ginger
1 teaspoon sugar
1 tablespoon grated garlic (about 5-6 cloves)
2-3 tablespoons seafood flavor or water
1-5 tablespoons Korean red pepper paste (goujung)
8 ounces Korean radish or daikon, peeled and cut into matchsticks
(in this demo I am using the peeled stem of the cauliflower, since I hate to waste it!)
4 scallions, trimmed and cut into 1-inch pieces
Cut the cabbage and cauliflower. Cut the cabbage lengthwise into quarters and remove the cores. Cut each quarter crosswise into 1-inch-wide strips or finer if desired (remember you can cut it smaller to serve, but of course you can't put the pieces back together to make them larger later! Cut the cauliflower into bite size pieces.
Salt the vegetables. Combine the vegetables and salt in a large bowl. Using your hands (gloves optional), massage the salt into the vegetables until it starts to soften a bit (the cauliflower won't soften), then add water to cover the vegetables. Put a plate on top and weigh it down with something heavy, like a jar or can of beans. Let stand for 1-2 hours.
Rinse and drain the vegetables. Rinse the cabbage under cold water 2 times and drain in a colander for 15-20 minutes.
Pack the cabbage into the jar, pressing down on it until the brine rises to cover the vegetables. Leave at least 1-inch of head space. Seal the jar with the lid.
For Kim Chee:
Make the paste. Meanwhile, combine the garlic, ginger, sugar, and seafood flavor (or 3 tablespoons water) in a small bowl and mix to form a smooth paste. Mix in the gochugaru, using 1 tablespoon for mild and up to 5 tablespoons for spicy (I like about 3 1/2 tablespoons).
Combine the vegetables and paste. Gently squeeze any remaining water from the cabbage and return it to the bowl along with the radish, scallions, and seasoning paste.
Mix thoroughly. Using your hands, gently work the paste into the vegetables until they are thoroughly coated. The gloves are optional here but highly recommended to protect your hands from stings, stains, and smells!
Pack the kimchi into the jar. Pack the kimchi into the jar, pressing down on it until the brine rises to cover the vegetables. Leave at least 1-inch of headspace. Seal the jar with the lid.
Let it ferment. Let the jar stand at room temperature for 1-5 days. You may see bubbles inside the jar and brine may seep out of the lid; place a bowl or plate under the jar to help catch any overflow.
Check it daily and refrigerate when ready.
Check the kimchi once a day, pressing down on the vegetables with a clean finger or spoon to keep them submerged under the brine. (This also releases gases produced during fermentation.) Taste a little at this point, too! When the kimchi tastes ripe enough for your liking, transfer the jar to the refrigerator. You may eat it right away, but it's best after another week or two.
1 (2-pound) head napa cabbage, white or red cabbage or a mix
Small head of cauliflower
1/4 cup sea salt or kosher salt
Water
1 tablespoon grated garlic (about 5-6 cloves)
or two green garlic stalks
For Kim Chee:
1 teaspoon grated ginger
1 teaspoon sugar
1 tablespoon grated garlic (about 5-6 cloves)
2-3 tablespoons seafood flavor or water
1-5 tablespoons Korean red pepper paste (goujung)
8 ounces Korean radish or daikon, peeled and cut into matchsticks
(in this demo I am using the peeled stem of the cauliflower, since I hate to waste it!)
4 scallions, trimmed and cut into 1-inch pieces
Cut the cabbage and cauliflower. Cut the cabbage lengthwise into quarters and remove the cores. Cut each quarter crosswise into 1-inch-wide strips or finer if desired (remember you can cut it smaller to serve, but of course you can't put the pieces back together to make them larger later! Cut the cauliflower into bite size pieces.
Salt the vegetables. Combine the vegetables and salt in a large bowl. Using your hands (gloves optional), massage the salt into the vegetables until it starts to soften a bit (the cauliflower won't soften), then add water to cover the vegetables. Put a plate on top and weigh it down with something heavy, like a jar or can of beans. Let stand for 1-2 hours.
Rinse and drain the vegetables. Rinse the cabbage under cold water 2 times and drain in a colander for 15-20 minutes.
Pack the cabbage into the jar, pressing down on it until the brine rises to cover the vegetables. Leave at least 1-inch of head space. Seal the jar with the lid.
For Kim Chee:
Make the paste. Meanwhile, combine the garlic, ginger, sugar, and seafood flavor (or 3 tablespoons water) in a small bowl and mix to form a smooth paste. Mix in the gochugaru, using 1 tablespoon for mild and up to 5 tablespoons for spicy (I like about 3 1/2 tablespoons).
Combine the vegetables and paste. Gently squeeze any remaining water from the cabbage and return it to the bowl along with the radish, scallions, and seasoning paste.
Mix thoroughly. Using your hands, gently work the paste into the vegetables until they are thoroughly coated. The gloves are optional here but highly recommended to protect your hands from stings, stains, and smells!
Pack the kimchi into the jar. Pack the kimchi into the jar, pressing down on it until the brine rises to cover the vegetables. Leave at least 1-inch of headspace. Seal the jar with the lid.
Let it ferment. Let the jar stand at room temperature for 1-5 days. You may see bubbles inside the jar and brine may seep out of the lid; place a bowl or plate under the jar to help catch any overflow.
Check it daily and refrigerate when ready.
Check the kimchi once a day, pressing down on the vegetables with a clean finger or spoon to keep them submerged under the brine. (This also releases gases produced during fermentation.) Taste a little at this point, too! When the kimchi tastes ripe enough for your liking, transfer the jar to the refrigerator. You may eat it right away, but it's best after another week or two.
Tuesday, November 19, 2013
Ongoing Experiments in Fermentation (Now with Video)
Burned sugar and smoked salt
This was an accidental creation- I call it burned sugar/smoked salt (black salt for short) It resulted from an attempt to smoke salt and brown sugar on the grill after cooking dinner. I've done it a dozen times but this time the grill wasn't closed all the way so therefore it kept cooking. By the time we went to bed I could smell the delicious aroma of burning sugar. Running out in my PJs I rescued it off the grill, thinking it was a total waste (even the pan seemed trashed) But after getting back into to bed and thinking about it, I decided to try to save it. Remember, it smelled great. After a few days of effort, trying to dry the caramelized sugar I ran the chunks through the food processor with additional salt and a healthy dose of corn starch to absorb some water. It worked great. It tastes great. And I have a ton of it!
Umeboshi- Brine fermented plums
Utilizing my creation above, some whole red plums, and water I am attempting to create something approximating Umeboshi. Seems to be going well so far... We'll see...
Pineapple, Apple & Pear Vinegars
I used the peels and cores only + filtered water and brown sugar. I did goose the ferment with actively fermenting Riesling wine vinegar. The bubbles started very quickly, after maybe 8 hours or so. They all smell great!
Guava lemongrass vinegar
Combined whole, crushed pineapple guavas with filtered water, brown sugar, citric acid (to raise pH) and after one day added lemongrass syrup and the lemongrass used to flavor the syrup. Again I goosed the ferment with actively fermenting Riesling wine vinegar. This one is the biggest "risk" in that the process isn't described in Mary Carlin's new book, Mastering Fermentation! http://masteringfermentation.com/index.html
Mushroom ketchup
Another complete experiment. Here's what went into it:2 cups dried Shiitake mushrooms
1 cup dried white mulberries
8 bay leaves whole
3 tsp black salt (see above)
1/2 whole nutmeg, broken into pieces
1 Tbsp shrimp paste
10 Allspice berries whole
2 tsp hot sauce. like Sriracha
1 cup brown sugar
1/4 cup soy sauce
5 cloves fermented garlic cloves
(more on this in the next post)
1/4 cup garlic brine
Ginger bug
Fresh Ginger
Whole Unrefined Cane Sugar
Filtered water
Peel the ginger and grate into a clean Mason jar. Add enough water to cover and add 1/4 cup of the sugar. Cover and allow to sit in a warm place overnight. Each day for the next 5 days, grate additional ginger, and add it with 1/4 cup water and 1/4 cup sugar. By the end of the five days your ginger bug should be bubbling along happily (be careful because the CO2 will blow the top right off!). You can keep the Bug on the counter but will have to feed it every few days. Or keep it in the fridge in a sort of suspended animation. This resulting liquid is enjoyable in marinades, sauces or combined with sparkling water, a refreshing beverage!
Labels:
experimental,
Fermentation,
preserving
Location:
North Park, San Diego, CA, USA
¡Tapas! Final menu and images...
Tortilla Espanola
Chicken and Ham Croquetas with Smoked Pimenton Aioli
Butternut & Blue Cheese Croquetas
Chickpea Fritters with Squid & Pickled Onion
Meatballs in Fig Sauce
Gambas al ajillo
A Wonderful Night!!
Friday, October 11, 2013
Bacon /// Bacon /// Bacon Wrap up
Last night's Bacon class was a success and there are new converts to the 'Make it yourself" gospel that I am trying to "preach." Sorry if this gets a bit strong for "just" a cooking site, but I have two bees in my bonnet this morning...
First, a word of explanation on why I teach classes like bacon making and cocktail bitter making: yes, there are folks who should probably eat less bacon and other fatty meats and, of course, drink less (myself included.) However one of the best arguments for making it yourself, aside from the very positive aspects of understanding how your food is made and customizing it to your tastes, is that the quality is so much higher than the factory produced crap out there that you are satisfied with less. There will always people who have the time and inclination to be offended by a wholesome cooking class being offered at a center that focuses on bringing people together in a myriad of ways. In my experience few things work better than sharing a meal around a common table. Food as medicine, the the theory of magic "good" foods vs. bad "evil" foods has always driven me nearly around the bend. There are no magic bullets out there, folks. When you make it yourself, you know what you are putting in your body. Rather than bacon pumped full of water (which you pay the same per pound price for as the meat) and god-knows-what-else, yours contains a very few ingredients, all of which are natural and safe...
This leads quickly to the other bee... the Nitrite issue. Much of this concern has very little science to back it up. Again the fat in the bacon is much worse for you than the small, small amount of nitrates left in the finished bacon. There are more nitrates in a kale salad than your Sunday morning bacon. I could ramble on about this but I will give you a quote from cookbook author and food expert, Michael Ruhlman,
"The fact is, most nitrate we consume comes from vegetables. Nitrate we consume coverts to nitrite in our body, which is a anti-microbial agent in our guts. Sodium nitrite in bacon cures the bacon (more info in my safety concerns for charcutepaloozians) and then converts to nitric oxide, so, while I’m not chemist, I have heard others suggest that you’re not actually consuming any nitrite by the time the bacon gets to you. Again, almost all the nitrate and nitrite in your body comes from veggies. It’s an anti-oxidant. Studies are coming out now saying it’s good for the heart.
A study in the Journal of Food Protection put it this way: “Since 93% of ingested nitrite comes from normal metabolic sources, if nitrite caused cancers or was a reproductive toxicant, it would imply that humans have a major design flaw.”
Read the full post here. http://ruhlman.com/2011/05/the-no-nitrites-added-hoax/ It is very enlightening.
Morning after breakfast...
First, a word of explanation on why I teach classes like bacon making and cocktail bitter making: yes, there are folks who should probably eat less bacon and other fatty meats and, of course, drink less (myself included.) However one of the best arguments for making it yourself, aside from the very positive aspects of understanding how your food is made and customizing it to your tastes, is that the quality is so much higher than the factory produced crap out there that you are satisfied with less. There will always people who have the time and inclination to be offended by a wholesome cooking class being offered at a center that focuses on bringing people together in a myriad of ways. In my experience few things work better than sharing a meal around a common table. Food as medicine, the the theory of magic "good" foods vs. bad "evil" foods has always driven me nearly around the bend. There are no magic bullets out there, folks. When you make it yourself, you know what you are putting in your body. Rather than bacon pumped full of water (which you pay the same per pound price for as the meat) and god-knows-what-else, yours contains a very few ingredients, all of which are natural and safe...
This leads quickly to the other bee... the Nitrite issue. Much of this concern has very little science to back it up. Again the fat in the bacon is much worse for you than the small, small amount of nitrates left in the finished bacon. There are more nitrates in a kale salad than your Sunday morning bacon. I could ramble on about this but I will give you a quote from cookbook author and food expert, Michael Ruhlman,
"The fact is, most nitrate we consume comes from vegetables. Nitrate we consume coverts to nitrite in our body, which is a anti-microbial agent in our guts. Sodium nitrite in bacon cures the bacon (more info in my safety concerns for charcutepaloozians) and then converts to nitric oxide, so, while I’m not chemist, I have heard others suggest that you’re not actually consuming any nitrite by the time the bacon gets to you. Again, almost all the nitrate and nitrite in your body comes from veggies. It’s an anti-oxidant. Studies are coming out now saying it’s good for the heart.
A study in the Journal of Food Protection put it this way: “Since 93% of ingested nitrite comes from normal metabolic sources, if nitrite caused cancers or was a reproductive toxicant, it would imply that humans have a major design flaw.”
Read the full post here. http://ruhlman.com/2011/05/the-no-nitrites-added-hoax/ It is very enlightening.
Morning after breakfast...
Wednesday, October 9, 2013
On to the Smoker!!
After seven days (the meat should feel firm ), take it out, rinse off all the seasonings under cold water and soak in fresh cold water for 6 hours or overnight. This helps to remove the extra salt but doesn’t remove the flavor from the cure. Drain the meat and pat it dry. If possible allow it to rest for 24 hours in the fridge on a cooling rack for better airflow. This helps the smoke really adhere to the meat.
Next mix up the dry rub for the cooking process. I like to add this to reinforce the flavors and add a gorgeous crust to the finished bacon. It’s important to be very careful with adding salt to this mix or it will be too salty. Spread the dry rub on a cookie sheet (with sides) and dredge the meat. The cookie sheet makes a great transport to the grill.
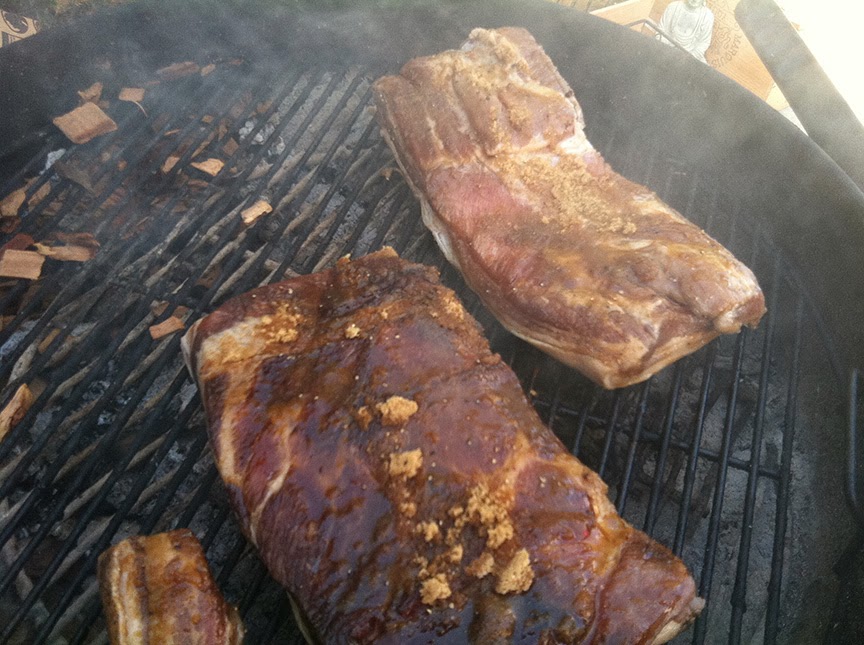
If you have a smoker or a grill, you can smoke the bacon. I use my Weber kettle grill and it works beautifully. Build a small fire with hardwood lump charcoal. When it starts to glow stir the coals so they sit deep in the grill. If you have a small grate in your grill place it TOP of the burning coals. Carefully place the tinfoil packet or the soaked woodchip on the grate, replace the grill grate and put the bacon on keeping it away from the hottest direct heat. Cover the grill with the vents open, and let smoke for 30 minutes, checking after 15 minutes. Turn and repeat. Check the internal temperature, it should be 150º. If it isn’t and you are happy with the level of smokiness, you can cook the bacon in a 200º oven until its done.
Let it cool and refrigerate it until you’re ready to cook it.
But I know. You won’t be able to wait.
So cut off a piece and cook it. Taste it, savor it.
Congratulations! It’s bacon!
Labels:
bacon,
cured meat,
easy,
Food geek,
pork belly,
preserving
Saturday, October 5, 2013
Breakfast Bacon Varieties... Including Beef Bacon
My Breakfast Bacon uses the regular dry cure with addition of additional brown sugar and blackstrap molasses. For the October 10th class I am experimenting with both pork belly and beef shortribs.. I have tried the beef bacon before but it turned out too salty, though it was remarkably bacon-like.
I cut the ribs off (save them OF COURSE! Never throw out flavor!! Great for stock, soup, etc...). Then dredged in the cure, and into the bag with extra sugar and molasses. The meat is a little thinner than a usual pork belly so I'll cure it for only 4 or 5 days.
Bacon Varieties...
For my "Bacon, Bacon, Bacon" class, I've decided on Sicilian and Moroccan as the two "regional flavors." Of course not much bacon is consumed in Morocco, but the spices (tumeric, garlic, sumac, za'atar, and Marrakech Moroccan Spice from Savory Spice (www.savoryspiceshop.com/blends/marr.html) are so good with grilled or smoked meats.
For the Sicilian I used garlic, oregano, dried onion, orange peel and my foraged fennel pollen. I'll do a fennel pollen foraging post later in the year. It's one of my favorite parts of living in SoCal.
Subscribe to:
Posts (Atom)